he Sonic Birthday Cake That’s Way Past Cool
SEGA! If you heard that in your head, you’re in the right place. There’s a birthday coming up for someone who lives by a simple creed: gotta go fast. And you, my friend, have been tasked with creating a cake that can keep up. Forget the boring sheet cakes from the grocery store. It’s time to create a Sonic birthday cake that’s bursting with action, adventure, and a whole lot of buttercream.
Don’t worry, you don’t need super-speed or a Chaos Emerald to pull this off. We’re going to break down how to create an iconic “Green Hill Zone” cake that looks like it’s straight out of the video game. This is the ultimate guide to a Sonic birthday cake that will make you the hero of the party.
Why This Sonic Cake is a Total Power-Up
So, why is this the ultimate cake for the Sonic fan in your life? Let’s do a spin dash through the reasons.
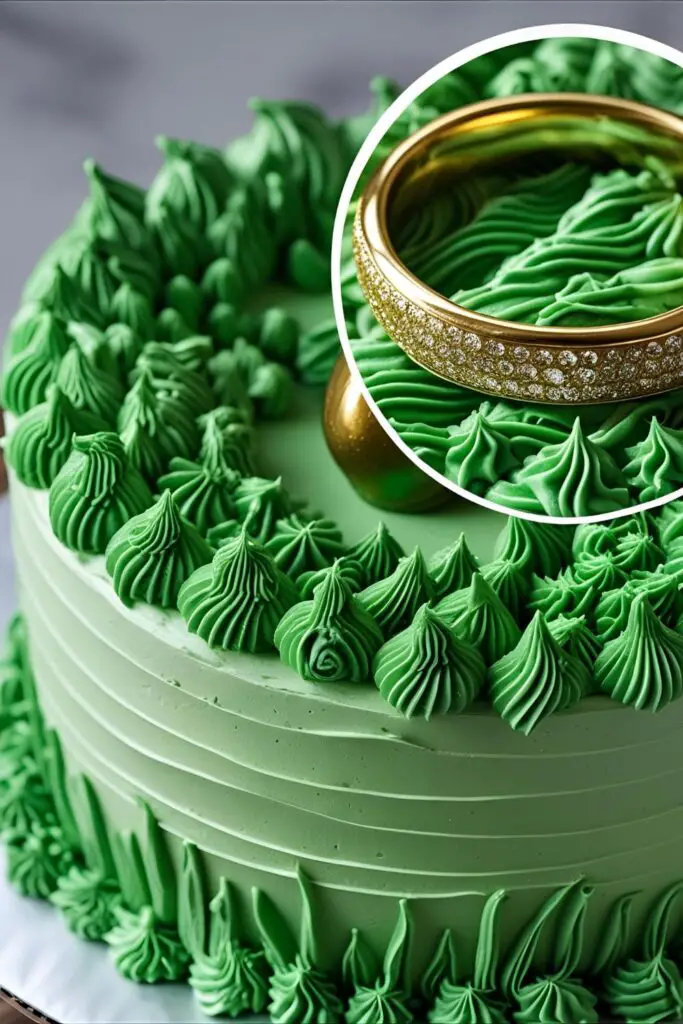
First, it’s a whole vibe. This isn’t just a cake with a picture of Sonic on it. We’re building an entire, edible level! The iconic checkerboard dirt, the green grass, the sparkling blue water—it’s a masterpiece of nerdy nostalgia that looks incredibly impressive.
Second, the decorating is more fun than a loop-de-loop. You get to play with textures, pipe some fun details, and create a whole little world. It’s a creative project that’s genuinely enjoyable, and the techniques are surprisingly forgiving. There’s no pressure for perfection here, just for fun.
Finally, it’s a cake and a toy in one! The grand finale is placing a brand-new Sonic figure right on top. The birthday kid gets an amazing cake and a new toy to play with after the candles are blown out. It’s a win-win.
Your Power-Up Item List (Ingredients)

To build Green Hill Zone, you’ll need to collect these essential items.
- For the “Green Hill” Cake:
- A baked and cooled 9×13 inch sheet cake. A sturdy vanilla or yellow cake is the perfect canvas for all the colorful frosting.
- Simple Vanilla Sheet Cake: 2 cups all-purpose flour, 1 ½ cups sugar, 1 tbsp baking powder, ½ tsp salt, 1 cup milk, ½ cup melted butter, 2 eggs, 2 tsp vanilla.
- For the “Landscape” Buttercream:
- A large batch of American Buttercream (about 6 cups).
- Green, blue, and brown/tan gel food coloring.
- For the Level Details:
- ½ cup crushed graham crackers or Biscoff cookies (for the sandy paths).
- Yellow fondant or yellow candy melts.
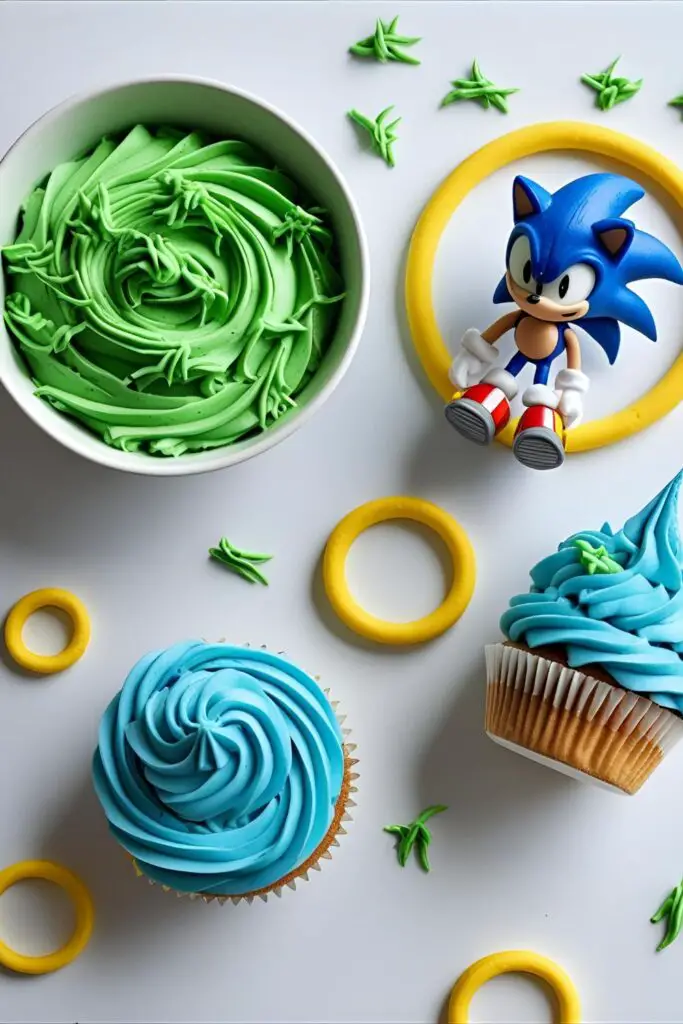
- A small amount of edible gold luster dust (optional, for extra shiny rings).
- A new, clean Sonic the Hedgehog toy figure.
Key Substitutions: A chocolate cake also works great for the base, giving you a “dirt” look when you cut into it! If you don’t have fondant, you can pipe the rings with yellow frosting.
The Mechanic’s Toolbox (Gadgets)
You don’t need Tails’ workshop, just these key tools.
- 9×13 inch Rectangular Cake Pan
- Stand Mixer or a Hand Mixer
- Offset Spatula (a long one is your best friend)
- Piping Bags
- Piping Tips: A grass tip (like Wilton #233) is a game-changer for this cake. A medium star tip is also useful.
- Small round cookie cutters (in two different sizes for the rings).
- Your awesome, clean Sonic the Hedgehog figure.
Step-by-Step Instructions: Time to Go Fast!
Ready to build the level? Let’s roll.
H3: “Green Hill Zone” — Baking Your Cake
- Prep the Level: Preheat your oven to 350°F (175°C). Grease and flour your 9×13 inch pan, or line it with parchment paper with an overhang for easy lifting.
- Mix Your Cake: Prepare your chosen cake batter. If using the simple vanilla recipe, just whisk the dry ingredients in one bowl, the wet in another, then combine. Easy peasy.
- Bake and Cool: Pour the batter into your pan and bake for 30-35 minutes, or until a toothpick comes out clean. Let the cake cool completely in the pan. A warm cake is Dr. Eggman’s secret weapon against good frosting.
H3: “Special Stage” — Making the Golden Rings
- Roll and Cut: While the cake cools, roll out your yellow fondant thinly on a surface dusted with powdered sugar.
- Create the Rings: Use your larger round cookie cutter to cut out circles. Then, use the smaller cutter to cut out the center of each circle, creating a perfect ring shape. Make a bunch of them!
- Add Some Shine (Optional): For that authentic golden glow, mix a tiny bit of gold luster dust with a few drops of clear alcohol (like vodka) or lemon extract to make a paint. Carefully paint your fondant rings and let them dry.
H3: “Boss Battle” — Frosting the Landscape
- Divide Your Buttercream: Whip up your batch of buttercream. Divide it into a few bowls: a large amount for green, a medium amount for blue, and a smaller amount for the tan/brown checkerboard pattern. Tint them with your gel food colors.
- Create Your Zones: Once the cake is cool, it’s time to map out your level. Use the tip of a knife to lightly sketch out your zones. Plan a winding “river” of blue, a “sandy” path, and the main green grassy areas.
- Frost the Flat Areas: Fill in your “river” with the blue buttercream and any “sandy” areas with the tan/brown buttercream, spreading them smoothly with a small offset spatula.
- The Checkerboard: For the iconic Green Hill Zone look, use a darker brown frosting in a piping bag to pipe a simple checkerboard pattern onto your tan-colored paths.
H3: “You’re Too Slow!” — Adding the Final Details
- Pipe the Grass: This is the best part. Fill a piping bag fitted with the grass tip with your green buttercream. Hold the bag straight up and pipe the “grass” in short bursts all over the green areas of your cake.
- Add the Sand: Sprinkle your crushed graham crackers or Biscoff cookies onto the tan paths to give them a sandy texture.
- Place Your Rings and Hero: Artfully arrange your golden rings around the level. Some can be lying flat, and others can be standing up. Finally, place your clean Sonic figure in a cool, action-packed pose. Your Sonic birthday cake is complete!
Calories & Nutritional Info
You gotta go fast to burn off these calories.
- Calories: A slice of this adventure is approximately 500-700 calories.
- Contains: 100% of your daily recommended dose of nostalgia.
- Goes Well With: Chili dogs (obviously).
Common Mistakes to Avoid (Or, How Not to Lose All Your Rings)
- A Muddy Mess: If you try to frost the different colored zones right next to each other without a plan, they can smear together. Lightly tracing your zones first and frosting one color at a time helps keep things clean. Chilling the cake after applying one color can also help.
- Sad, Droopy Grass: If your buttercream is too soft, your piped grass will look limp and sad. You want a medium-stiff consistency for the best grass texture. If it’s too soft, beat in more powdered sugar or chill it for a bit.
- Using a Grimy Toy: I know that Sonic figure has seen some things. But for the cake, use a brand new, thoroughly washed toy. No one wants to eat frosting that’s been seasoned with whatever is living under your kid’s bed.
- Dull Yellow Rings: If your fondant rings look more “mustard yellow” than “golden,” the gold luster dust is a game-changer. It takes them from looking homemade to looking like a real power-up.
Variations & Customizations
Feel like exploring a different zone?
- The “Chemical Plant Zone”: A more advanced but super cool idea. Frost the cake in a vibrant blue and purple checkerboard pattern. Use grey-tinted fondant to create “metal” platforms and yellow and black striped details.
- Tails & Knuckles Join the Party: It’s easy to make this a team effort! Simply add clean toy figures of Tails, Knuckles, or any other favorite characters to the scene.
- The Chaos Emerald Hunt: Buy a pack of multi-colored rock candy. Break off a few chunks that look like the Chaos Emeralds and hide them around the Green Hill Zone for the birthday kid to find.
FAQ: Your Ringside Questions, Answered

Let’s clear up some questions at super-sonic speed.
H3: How do I make the gold rings?
The easiest way is to use yellow fondant and two concentric circle cutters. To make them really pop, paint them with edible gold luster dust mixed with a little vodka or lemon extract.
H3: What’s the best way to make the Green Hill Zone checkerboard pattern?
Frost the path with a light tan or brown frosting first. Then, use a piping bag with a darker brown frosting and a medium star tip to pipe a grid of squares on top.
H3: Do I really have to clean a new toy figure?
Yes! New toys can have factory residues on them. A quick wash with warm, soapy water and a thorough rinse and dry is a quick and easy step to ensure food safety.
H3: Can I make this Sonic birthday cake ahead of time?
You can bake the cake a day or two in advance and keep it well-wrapped. It’s best to decorate the cake the day of the party for the freshest look, but you can do it the day before and store it in the fridge. Add the Sonic figure just before serving.
H3: What is a grass piping tip and is it necessary?
A grass tip (like Wilton #233) is a multi-opening tip that pipes several thin strands of frosting at once, looking just like grass. It’s not strictly necessary (you could just have a smooth green frosting), but it’s what gives this cake its signature, awesome look.
H3: What’s the best cake flavor to use?

A vanilla or yellow cake is great because the bright crumb won’t distract from the colorful decorations on top. However, a chocolate cake is also a fantastic choice, as it looks like “dirt” when you cut into it!
H3: Can I use a round cake instead of a sheet cake?
Absolutely! You can create a two-tiered round cake and decorate each tier like a different level, or just create your Green Hill Zone on a single round cake.
Final Thoughts: You’re Too Cool!
You did it. You went fast, you collected the rings, and you defeated the boss level of birthday cakes. You now have an epic Sonic birthday cake that is guaranteed to be the highlight of the party.
So go on, take your victory lap. And when the birthday kid sees their favorite blue hedgehog ready for action on top of a delicious, edible world, you’ll know you’ve created something truly super-sonic.