The Korean Bento Cake Guide That’s Probably Cuter Than You Are
You’ve seen them all over your Instagram feed, nestled in their perfect little takeaway boxes. They’re tiny, they’re pastel, and they have sassy or adorable messages piped on top in a charmingly imperfect script. This, my friend, is the Korean bento cake (or lunchbox cake), and it has taken the internet by storm. It’s the cake you get when you want to celebrate, but, like, not “bake-a-whole-giant-cake” celebrate.
But every time you see one, you probably think, “That’s so cute, but I could never.” I am here today to call your bluff. Making your own Korean bento cake is not only achievable, it’s a ridiculously fun way to get creative without the pressure of decorating a huge, formal cake. Get ready to enter your minimalist baker era.
Why This Mini Cake is a Major Vibe
So why has the entire world become completely obsessed with these tiny cakes? And why should you jump on this adorable bandwagon immediately?
First, it’s perfectly personal. A bento cake is, by design, a cake for one or two people. It’s the perfect way to say “Happy Birthday,” “Congrats,” “I’m Sorry You Had a Bad Day,” or “I Love You” without the commitment of a giant dessert. It feels special and intimate.
Second, it’s a low-pressure creative playground. The signature look is minimalist, abstract, or features simple, cute characters. There’s no need for perfect, razor-sharp edges or intricate piping. In fact, a little bit of a “homemade” look is part of the charm! It’s all about the aesthetic.
Finally, it’s just plain fun. From baking the tiny layers to mixing the perfect pastel buttercream and writing a cheeky message on top, the whole process is a joy. It’s a small project with a huge, adorable payoff. IMO, it’s the best way to spend an afternoon.
Your Tiny Ingredient List

To make one perfect little bento cake, you’ll need to think small. This recipe makes one 4-inch, two-layer cake.
- For the Mini Vanilla Cake Layers:
- ¾ cup + 2 tablespoons all-purpose flour
- ½ cup granulated sugar
- ½ teaspoon baking powder
- ¼ teaspoon baking soda
- ¼ teaspoon salt
- ¼ cup (½ stick) unsalted butter, softened
- 1 large egg, at room temperature
- ½ teaspoon vanilla extract
- ½ cup buttermilk, at room temperature
- For the Aesthetic Buttercream:
- ½ cup (1 stick) unsalted butter, softened
- 2 cups powdered sugar, sifted
- 1-2 tablespoons milk or heavy cream
- ½ teaspoon vanilla extract
- Pastel gel food coloring (pinks, blues, yellows, greens are popular)
- A tiny bit of black or dark-colored gel food coloring for writing.
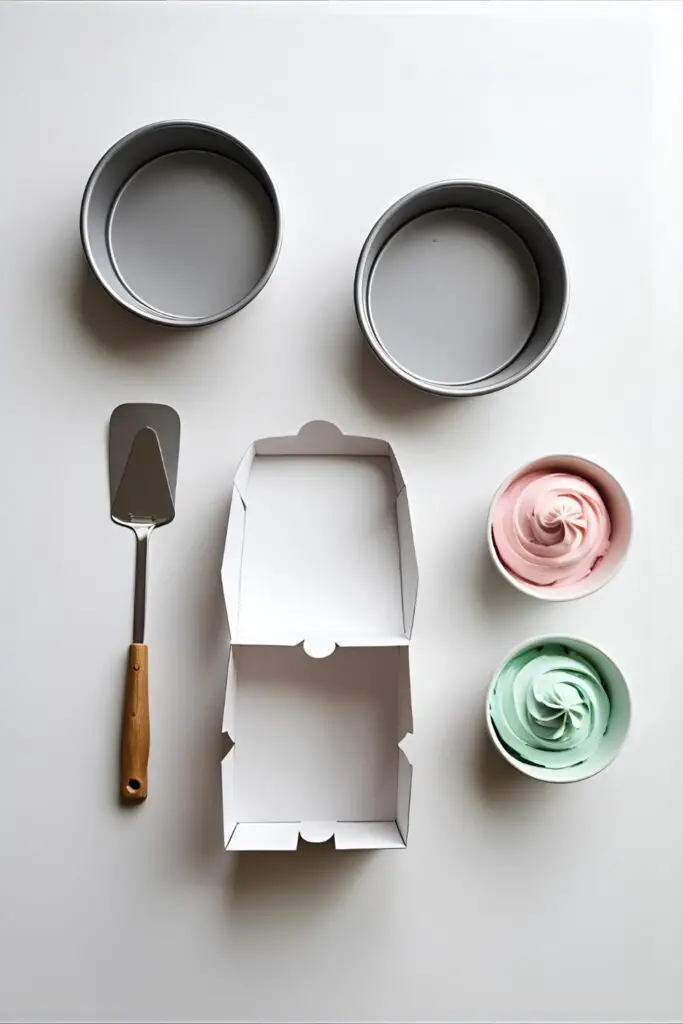
- For Packaging (Crucial for the Vibe!):
- One 6×6 inch clamshell takeaway container (like a burger or lunch box).
- A small square of parchment paper.
Key Substitutions: You can easily make this a mini chocolate cake by substituting 3 tablespoons of the flour with unsweetened cocoa powder. A cream cheese frosting also works beautifully!
The Tiny Tools for Your Tiny Cake
To make a mini cake, you’ll need a few specific tools.
- Two 4-inch Round Cake Pans (this is the key!)
- A small Offset Spatula
- A small Cake Turntable (optional, but makes life easier)
- Piping Bags
- Small Piping Tips: A small round tip (like a Wilton #2 or #3) for writing is essential. Small star or shell tips are great for borders.
- The all-important Clamshell Takeaway Containers.
Step-by-Step Instructions: Let’s Make Something Cute
Ready to create your mini masterpiece? Let’s do it.
H3: Step 1: Bake Your Tiny Cake Layers
- Prep Your Mini Pans: Preheat your oven to 350°F (175°C). Grease and flour your two 4-inch cake pans and line the bottoms with parchment paper.
- Mix It Up: This is a simple one-bowl method. In a medium bowl, combine the softened butter and sugar and beat until creamy. Add the egg and vanilla and beat until combined.
- Combine the Rest: In a separate small bowl, whisk the flour, baking powder, baking soda, and salt. Add half of the dry ingredients to the butter mixture, followed by all of the buttermilk. Finish with the rest of the dry ingredients. Mix until just combined.
- Bake Fast: Divide the batter evenly between your two tiny pans. Bake for 15-20 minutes. These bake fast, so keep an eye on them! A toothpick inserted into the center should come out clean.
- Cool Completely: Let the layers cool in their pans for 10 minutes before turning them out onto a wire rack to cool completely.
H3: Step 2: Assembling Your Mini Masterpiece
- Whip the Buttercream: While the cakes cool, beat your softened butter until creamy. Gradually add the sifted powdered sugar. Add the vanilla and 1 tablespoon of milk, then beat on high for 2-3 minutes until light and fluffy, adding more milk if needed.
- Create Your Palette: Divide the buttercream into small bowls. Leave most of it white or a very pale base color. Tint the other small amounts with your chosen pastel gel colors.
- Build It: Place one tiny cake layer on a small piece of cardboard or directly on your turntable. Add a thin layer of frosting. Top with the second cake layer.
- Frost It: Apply a thin crumb coat and chill for 15 minutes. Then, apply your final coat of frosting. Don’t stress about perfection! The Korean bento cake style often embraces rustic swirls and swoops.
H3: Step 3: The Art of the Aesthetic Decoration
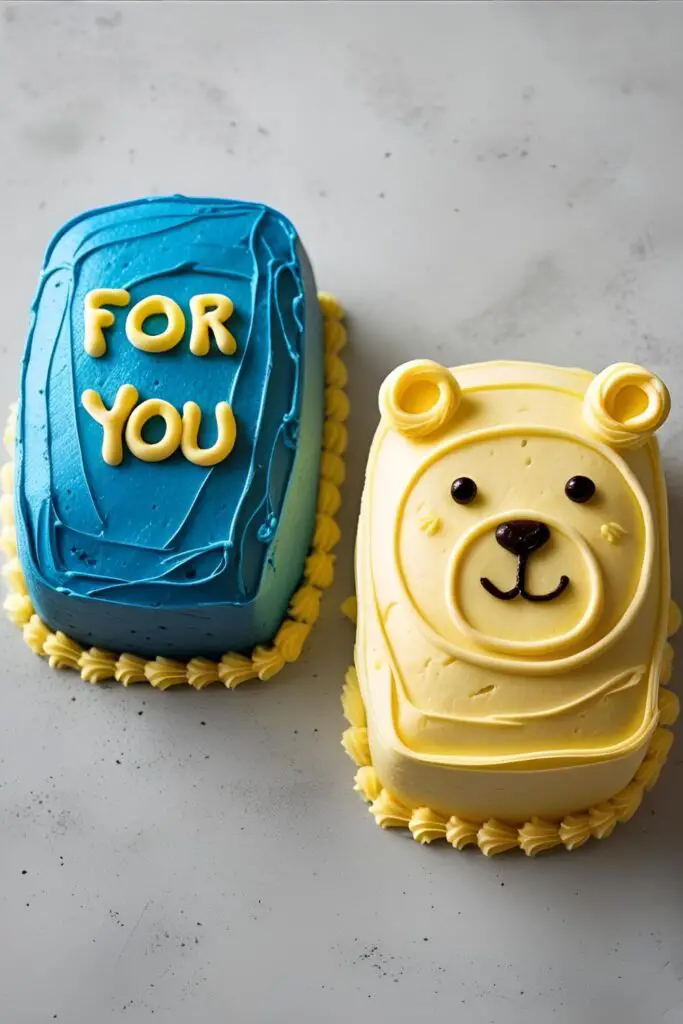
- Choose Your Design: This is the fun part! You can pipe a simple border, create abstract swooshes with different colors, make a simple character face (like a bear or frog), or write a message.
- Piping Your Message: Fit a piping bag with a small round tip and fill it with your dark-colored frosting. Practice on a piece of parchment paper first! Write your cheeky or sweet message on top of the cake. Imperfect, slightly shaky handwriting is part of the charm.
- The Final Package: Place a square of parchment paper inside your clamshell container. Carefully use a spatula to lift your finished mini cake and place it slightly off-center inside the box. Close the lid, and you’re ready to gift (or eat) your adorable Korean bento cake.
Calories & Nutritional Info
It’s a tiny cake. The calories are tiny too, right? …Right?
- Serving Size: The whole dang cake (it’s for you!)
- Calories: Approximately 1000-1400 for the entire cake. It’s a small cake, not a low-calorie cake. 😉
- Main Nutrient: Cuteness.
- Pairs well with: A small celebration, a bad day, or a really good K-drama.
Common Mistakes to Avoid (Or, How Not to Have a Tiny Disaster)
- Overbaking the Layers: These are 4-inch cakes. They bake in a flash compared to regular cakes. Start checking them at the 15-minute mark to avoid a dry, sad bento.
- A Bulky, Lopsided Cake: Go easy on the filling between the layers. Too much frosting will make your tiny cake unstable and wobbly. A thin layer is all you need.
- Overcrowding the Design: The key to the Korean bento cake aesthetic is minimalism. Don’t try to pipe a novel and a dozen roses on top. A simple message, a small character, or a few abstract swoops is all you need.
- Messy Handwriting: That charmingly imperfect script can quickly turn into an illegible scrawl. Practice piping your message on parchment paper a few times to get a feel for the pressure and flow before you touch the cake.
Variations & Customizations
Once you master the mini, the possibilities are endless.
- Chocolate Bento Cake: Use a small-batch chocolate cake recipe and a chocolate or vanilla buttercream. Perfect for the chocoholic in your life.
- Simple Character Cakes: The minimalist style is perfect for cute characters. Use pink frosting for a Kirby or Jigglypuff face, or green for a frog. Just simple piped eyes and mouths are all you need.
- The “Intentional Messy” Vibe: This is my favorite. Use your main color to frost the cake, then use the back of a spoon or a small spatula to add artistic swoops and smears of 2-3 other pastel colors. It’s abstract, beautiful, and requires zero precision.
FAQ: Your Tiny Cake Questions, Answered

Let’s get to the bottom of these little beauties.
H3: What if I don’t have 4-inch cake pans?
You can bake a thin layer of cake in a larger pan (like an 8-inch pan) and use a 4-inch cookie or biscuit cutter to cut out your mini layers. It’s a great way to use what you have!
H3: What’s the best frosting for this decorating style?
A simple American buttercream or a sturdy Swiss meringue buttercream works best. You want something that holds its shape for piping but is also smooth enough for a clean finish.
H3: How do you write on a cake so neatly?
The trick is to use a small round piping tip (like a #2) and have your frosting at the right consistency—not too stiff, not too soft. And the most important tip: practice on parchment paper first!
H3: Where do I get the bento boxes?
You can find these biodegradable clamshell containers (often called burger boxes or lunch boxes) at restaurant supply stores or online. Look for ones that are about 6×6 inches.
H3: Can I make a Korean bento cake ahead of time?
Yes! You can bake and assemble the cake, then store it in its closed bento box in the refrigerator for up to 2 days. The box actually helps keep it fresh.
H3: What are some popular designs for bento cakes?

Simple messages (“Happy Birthday,” “Love U,” “For You”), minimalist floral or leaf piping, simple smiley or bear faces, and abstract color swoops are all very popular.
H3: Is this cake meant for one person?
Traditionally, yes! It’s meant to be a personal-sized treat. But it’s also perfect for sharing between two people for a small, intimate celebration.
Final Thoughts: The Art of the Tiny Treat
You did it. You’ve created a tiny, edible work of art. You’ve mastered the viral trend and now have the power to create an adorable, personalized cake for any occasion, big or small.
So go ahead, gift your perfect little Korean bento cake to a friend, a loved one, or—most importantly—to yourself. Because sometimes, the best things really do come in small packages.