The Car Theme Cake That Will Win First Place at Any Party
Start your engines! You have a birthday on the horizon for a car-obsessed kid (or, let’s be honest, a car-obsessed adult), and the pressure is on. You could attempt a 3D, sculpted car cake that requires an engineering degree and the patience of a saint, or you could end up with something that looks less like Lightning McQueen and more like a melted crayon. But what if I told you there’s a better way? A way to create an epic car theme cake that looks incredible, is ridiculously fun, and requires absolutely zero sculpting skills?
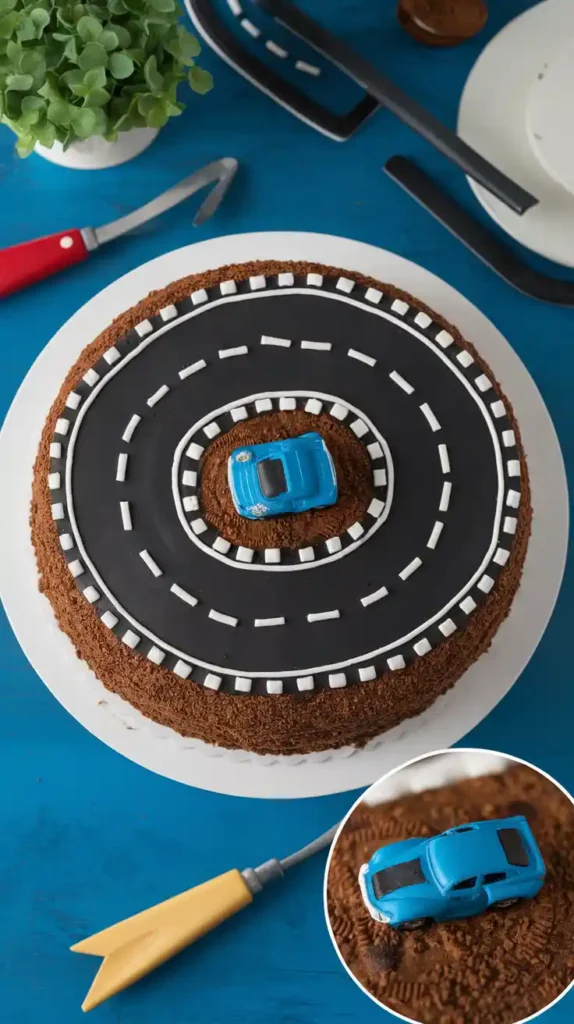
Buckle up, because we’re making the ultimate Race Track Cake. This is the undisputed champion of car cakes. It’s a delicious, moist chocolate sheet cake that we are going to transform into a raceway complete with edible dirt, grassy fields, and, of course, cars. This is the car theme cake that’s more about having fun than having a nervous breakdown.
Why This Car Theme Cake Laps the Competition
So what makes this race track cake the GOAT of all vehicle-based desserts? Let’s pop the hood and take a look.
First, it’s ridiculously easy. We’re starting with a simple, no-fail chocolate sheet cake. The decorating is basically just spreading frosting and sprinkling on crushed-up cookies. There is no fondant, no complex piping, and no carving required. It’s all of the fun with none of the stress.
Second, it’s an interactive masterpiece. This is a cake and a playset all in one. The birthday kid gets to see their favorite toy cars zooming around on an edible race track. And after the candles are blown out? They get to keep the cars! It’s a gift that keeps on giving.

Finally, the “wow” factor is huge for the effort involved. This cake looks so cool. The contrast of the black “asphalt,” green “grass,” and brown “dirt” is visually awesome. It’s a centerpiece that gets everyone excited and makes you look like a creative genius.
Your Pit Stop Ingredient List

To build this raceway, you’ll need to fuel up with these supplies.
- For the Chocolate “Dirt” Sheet Cake:
- 2 cups all-purpose flour
- 2 cups granulated sugar
- ¾ cup unsweetened cocoa powder
- 2 teaspoons baking soda
- 1 teaspoon baking powder
- 1 teaspoon salt
- 1 cup buttermilk
- ½ cup vegetable oil
- 2 large eggs
- 1 teaspoon vanilla extract
- 1 cup hot water or coffee
- For the “Landscape” Buttercream:
- 1 ½ cups (3 sticks) unsalted butter, softened
- 5-6 cups powdered sugar, sifted
- ¼ cup milk or heavy cream
- 1 teaspoon vanilla extract
- Pinch of salt
- Black and green gel food coloring
- For the Race Track Details:
- 1 cup crushed Oreo cookie wafers (no filling!) for the “dirt.”
- A few new, thoroughly washed toy cars (Hot Wheels are perfect).
- Optional: Checkered flag toothpicks, traffic cone candles.
Key Substitutions: You can use your favorite chocolate cake recipe or even a box mix for the base. The key is baking it in a 9×13 inch pan.
The Mechanic’s Toolbox
You don’t need a whole garage, just a few key tools.
- 9×13 inch Rectangular Cake Pan
- Stand Mixer or a Hand Mixer
- Food Processor (for making the Oreo “dirt”) or a Ziploc bag and a rolling pin
- Parchment Paper
- Wire Cooling Rack
- Offset Spatula (a long one is great for sheet cakes)
- Piping Bags and a Grass Piping Tip (like Wilton #233), optional but very cool.
Step-by-Step Instructions: Let’s Build This Racetrack!
Gentlemen (and ladies), start your ovens!
H3: Step 1: Bake the Chocolate Foundation
- Prep Your Pan: Preheat your oven to 350°F (175°C). Grease and flour your 9×13 inch pan, or line it with parchment paper leaving an overhang on the sides to easily lift the cake out later.
- Mix Dry, Mix Wet, Combine: In a large bowl, whisk together the flour, sugar, cocoa powder, baking soda, baking powder, and salt. In a separate bowl, whisk the buttermilk, oil, eggs, and vanilla. Pour the wet ingredients into the dry and mix until just combined.
- The Hot Water Trick: Carefully stir in the hot water or coffee. The batter will be very thin. This is the secret to a moist cake!
- Bake: Pour the batter into your prepared pan. Bake for 30-35 minutes, or until a toothpick inserted into the center comes out clean. Let it cool completely in the pan on a wire rack. A warm cake will tear when you try to frost it.
H3: Step 2: Make the Buttercream & Prep Details
- Whip the Buttercream: In your stand mixer, beat the softened butter until creamy. Gradually add the sifted powdered sugar. Add the vanilla and salt. Stream in the milk or cream until you reach a smooth, spreadable consistency.
- Divide and Conquer: Divide your buttercream into three bowls. Leave one small bowl white. Tint one medium bowl green, and the largest bowl black. Pro tip: Start with chocolate buttercream and add black food coloring to get a deep black without a bitter taste.
- Make the “Dirt”: Pulse the Oreo cookie wafers (no cream filling!) in a food processor until they resemble fine crumbs.
H3: Step 3: Assembling Your Car Theme Cake
- Pave the Road: Once the cake is completely cool, use your offset spatula to frost the entire top of the cake with a smooth layer of black buttercream. This is your asphalt.
- Add the Landscape: Use the green buttercream to create “grass” around the edges of the cake. You can either spread it flat or use a grass piping tip to make it look more realistic.
- Draw the Lines: Use the white buttercream in a piping bag with a small round tip (or a Ziploc bag with the corner snipped off) to pipe the dividing lines down the middle of your road.
- Get Dirty: Sprinkle the Oreo “dirt” in patches on the grassy areas or on the corners of the track.
- Place the Cars! This is the final, glorious step. Arrange your clean toy cars on the racetrack. Add any other decorations like flags or cones. Your car theme cake is complete!
Calories & Nutritional Info
This is a birthday cake. Let’s not get bogged down in the details.
- Calories: A respectable slice will probably be in the 500-700 calorie range.
- Fuel Type: High-octane sugar.
- Performance: Guaranteed to improve party performance by at least 50%.
- Great for: Fueling a long afternoon of playing with new toys.
Common Mistakes to Avoid (Or, How to Avoid a Pile-Up)
- Using Dirty Toys: Please, for the love of all that is holy, use new, clean toy cars. Give them a good wash with soap and water before they touch the cake. The 5-second rule does not apply to that car that’s been living under your couch.
- A Soupy Mess: If your buttercream is too soft, your “asphalt” will look like a tar pit, and your piped grass will wilt. If it’s a warm day, don’t be afraid to chill your frosting for a few minutes to help it firm up.
- A Crumbly Road: Frosting a warm cake is a recipe for disaster. You’ll get chocolate crumbs all through your black and green frosting. Patience is key; let the cake cool completely.
- Muddy Dirt: If you crush your Oreos with the cream filling still inside, you’ll get a clumpy, slightly greasy “dirt.” For the best texture, scrape out the cream and use only the chocolate wafers.
Variations & Customizations

Feel like taking a detour? Try these fun ideas.
- The Construction Zone: Instead of black and green, use yellow and brown frosting. Use crushed chocolate bars and cookies to create piles of “dirt” and “rocks.” Top with clean toy construction vehicles like bulldozers and dump trucks.
- The Monster Truck Rally: Use a chocolate cake base and chocolate frosting. Create ramps out of brownies or extra cake pieces. Cover everything in Oreo “dirt” and top with toy monster trucks.
- The “Cars” Movie Theme: Frost the cake to look like a desert road. Use red-tinted frosting or cake for a “Radiator Springs” vibe and top with Lightning McQueen and Mater toy cars.
FAQ: Your Questions from the Grandstand
Got questions? We’ve got answers.
H3: Do I really need to wash new toy cars?
Yes! It’s always better to be safe. Give them a quick wash with warm, soapy water and dry them thoroughly to remove any factory residue before placing them on your edible creation.
H3: How do I make black frosting without it tasting bitter?
The best trick is to start with a chocolate buttercream base and then add black gel food coloring. The chocolate provides a dark starting point, so you need much less black dye, which avoids that bitter, chemical taste.
H3: What’s the best way to make edible “dirt”?
Crushed Oreo cookie wafers are the undisputed champion. They have the perfect color and a fine, crumbly texture. Scrape out the cream filling for the best results.
H3: Can I make this car theme cake ahead of time?
Absolutely. You can bake the sheet cake a day or two in advance. Keep it well-wrapped at room temperature. You can frost and decorate it the day of the party for the freshest look.
H3: What other cake flavors work for this?

A vanilla or yellow cake would also be great! You could tint it to look like “sand” or just have a fun surprise under the “asphalt.” The most important thing is that it’s baked in a 9×13 pan.
H3: Can I use a different kind of frosting?
You can, but a classic American buttercream is recommended because it “crusts” over and holds its shape well, which is great for this design. A cream cheese frosting might be a bit too soft.
H3: How do I store leftovers?
Store any leftover cake covered in the refrigerator for up to 4 days. Just be sure to remove the toy cars first!
Final Thoughts: And the Winner Is… YOU!
You’ve crossed the finish line! You’ve created a fun, delicious, and totally awesome car theme cake that is guaranteed to be the talk of the party. You’ve successfully avoided a major baking pile-up and created something truly special.
So go ahead, take a victory lap. And when the birthday kid’s eyes light up, you’ll know you’ve won the grand prize. Now, let them eat cake!