How to Create a Magical Unicorn Cake Design (Without Losing Your Mind)
You’ve seen them all over Pinterest and Instagram. Those majestic, pastel-swirled cakes with a golden horn, sleepy eyes, and a mane of glorious buttercream. The unicorn cake. It’s the stuff of birthday party legend. And your first thought is probably, “There’s no way I can make that. I’m not a wizard.” But what if I told you that creating this enchanting unicorn cake design is totally within your reach?
Forget paying a fortune at a fancy bakery. We’re about to demystify the magic and break it down into simple, manageable steps. This isn’t just a recipe; it’s your entry into the world of next-level cake decorating. Get ready to create a show-stopping unicorn cake design that will make you look like a pastry rockstar.
Why This Unicorn Cake Design Is a Total Game-Changer
So, why should you tackle this mythical beast of a cake? The reasons are as magical as the cake itself.
First, the “WOW” factor is off the charts. Seriously. You place this cake on the table, and the room goes silent, followed by a chorus of oohs and aahs. It’s a camera-eats-first kind of dessert that makes any celebration feel ten times more special. You’re not just making a cake; you’re making a memory.
Second, it’s easier than it looks. I know, I know, it looks incredibly intricate. But here’s the secret: it’s just a few basic components. A simple cake, some frosting, a horn, and some piping. We’ll break down each element so there’s zero guesswork.

Finally, it’s completely customizable. You can change the colors of the mane to match your party’s theme, make a rainbow surprise cake on the inside, or even create a spooky “goth” unicorn for Halloween. Once you learn the basic unicorn cake design, the possibilities are endless.
What You’ll Need: Your Magical Ingredients & Supplies
Let’s gather our supplies. We’re breaking this down into the cake itself and the decorative elements.
- For the Cake:
- One tall layer cake, either 6 or 8 inches in diameter. A sturdy vanilla, white, or funfetti cake works best. You’ll want at least 3-4 layers to get that impressive height. You can use your favorite recipe or a box mix—no judgment here!
- For the Buttercream:
- A large batch of white buttercream frosting. You’ll need about 6-8 cups. A sturdy American buttercream or a smooth Swiss meringue buttercream are both great choices.
- Gel Food Coloring: At least 3-4 pastel colors (e.g., pink, teal, purple, light blue). Gel coloring is a must for vibrant colors without thinning your frosting.
- For the Horn & Ears (Fondant Elements):
- White fondant
- A small amount of pink fondant
- Gold Luster Dust: This is what gives the horn its magical shimmer.
- A thin wooden skewer or dowel
- A few drops of clear alcohol (like vodka) or lemon extract to make the gold paint.
- For the Face & Mane:
- Black edible food marker or black food coloring for the eyes.
- Fun sprinkles (optional, but are they really?)
Tools & Kitchen Gadgets Used
Having the right gear makes all the difference between a magical experience and a frustrating one.
- Cake Turntable: Absolutely essential for getting a smooth finish on your frosting.
- Cake Scraper (or Bench Scraper): The secret weapon for those flawlessly smooth sides.
- Offset Spatula: For applying and swooshing frosting.
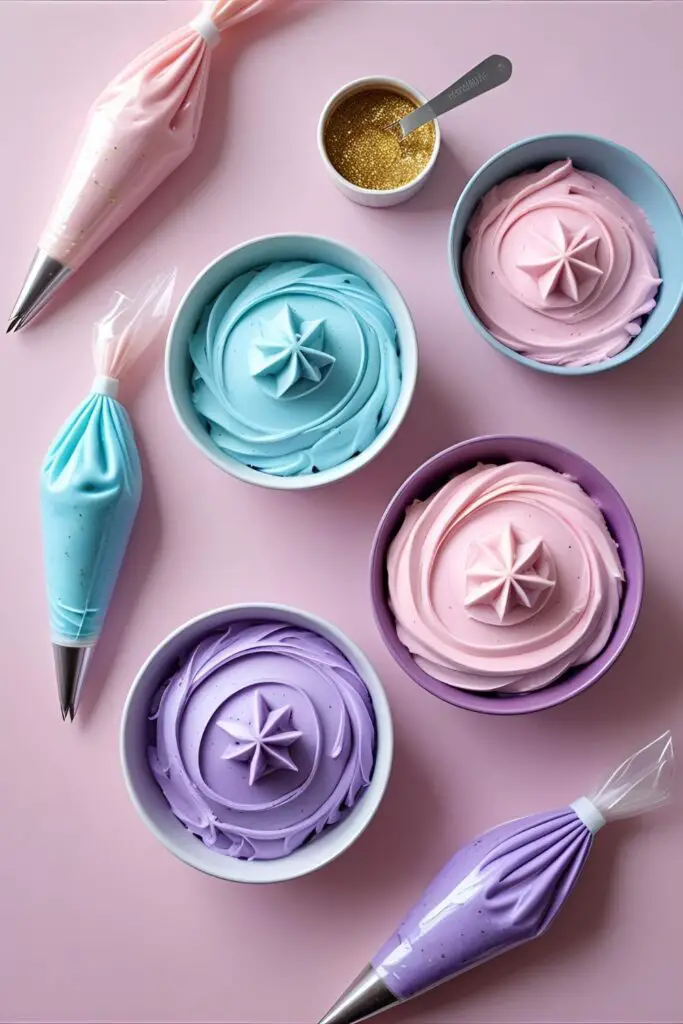
- Piping Bags: You’ll need several for the different colors of the mane.
- Large Star Piping Tips: Tips like the Wilton 1M or 2D create those beautiful rosettes and stars for the mane.
- Food-Safe Paint Brushes: For applying your gold luster dust paint.
- Small Rolling Pin: For the fondant ears.
Step-by-Step Instructions: Bringing Your Unicorn to Life
Ready to make some magic? Follow these steps, and you’ll be golden. Literally.
H3: Step 1: Make the Horn & Ears (Do This 1-2 Days Ahead!)
- Create the Horn: Take a good-sized chunk of white fondant and roll it into a long, tapered log, like a carrot. Insert a wooden skewer through the center, leaving a few inches exposed at the bottom.
- Twist It: Gently twist the fondant log around the skewer to create the classic spiral unicorn horn shape.
- Make the Ears: Roll out some white fondant. Cut out two pointed leaf shapes for the outer ears. Roll out the pink fondant and cut two smaller inner ear shapes. Use a tiny dab of water to glue the pink part onto the white part. Pinch the bottom of each ear slightly to give it some dimension.
- Let Them Dry: This is CRUCIAL. Stand the horn up in a styrofoam block or a tall glass. Lay the ears on a curved surface (like a rolling pin) to give them a natural shape. Let them air dry for at least 24 hours, or until they are rock hard. A floppy horn is a sad horn.
- Go for Gold: Once dry, mix a small amount of gold luster dust with a few drops of vodka or lemon extract to form a paint. Carefully paint the horn and the tips of the ears. Let the paint dry completely.
H3: Step 2: Assemble and Frost the Cake
- Crumb Coat: Place your completely cooled cake layers on the turntable. Apply a thin layer of white buttercream all over the cake. This is the crumb coat, and it traps all the loose crumbs.
- Chill Out: Place the crumb-coated cake in the fridge for at least 30 minutes to firm up. Don’t skip this! It’s the key to a flawless final coat.
- The Final Coat: Apply a thick, generous layer of white buttercream over the entire chilled cake. Place your cake scraper flat against the side and, while rotating the turntable, smooth the sides into a perfect cylinder. Smooth the top with your offset spatula.
H3: Step 3: Create the Magical Mane & Face
- Color Your Frosting: Divide the remaining buttercream into 3-4 bowls and tint each with your chosen pastel gel colors.
- Prepare Piping Bags: Fit your piping bags with the star tips and fill each with a different color of frosting.
- Pipe the Mane: This is the fun part! Start piping rosettes, stars, and dollops of different colored frosting along the top edge of the cake and cascading down one side. Alternate colors and tip styles to create a beautiful, textured mane. Go wild with it!
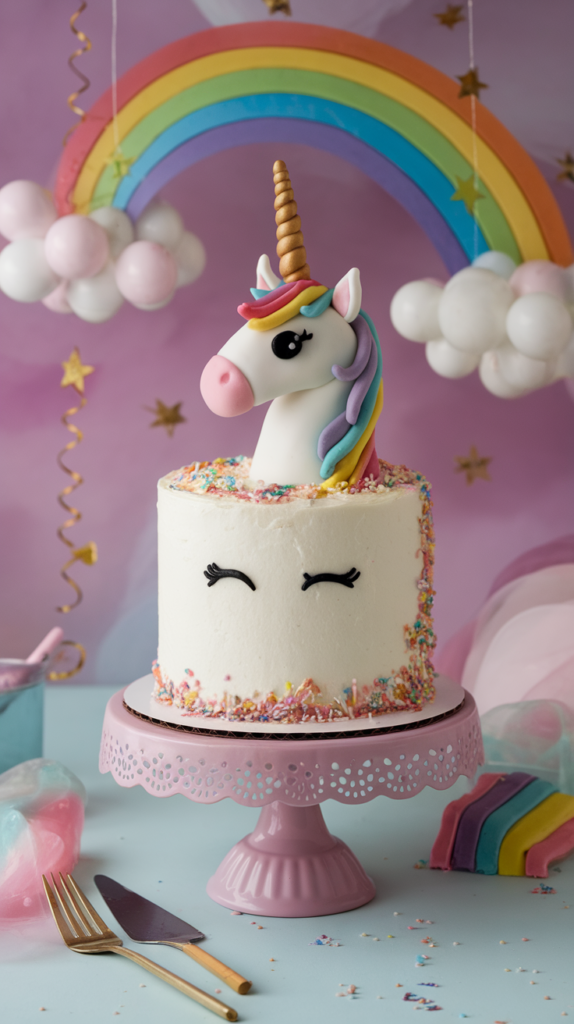
- Draw the Eyes: Use your black edible marker or a very fine brush with black food coloring to draw two simple, sleepy inverted “U” shapes for the eyes on the front of the cake. Add a few little eyelashes.
H3: Step 4: The Grand Finale
- Assemble Your Unicorn: Gently press the dried fondant ears into the top of the cake, just behind where the mane starts. Carefully insert the skewer of your golden horn into the center of the cake, right between the ears.
- Add Sprinkles: If you’re using sprinkles, now is the time to add a little extra sparkle to the mane. Stand back and admire your masterpiece!
Calories & Nutritional Info
You came here for a unicorn cake design, not a diet plan, right? But if you must know…
- Serving Size: One magical slice.
- Calories: Approximately 600-800 kcal per slice (it’s mostly butter, sugar, and joy).
- Sugar: Let’s just say it’s “a lot” and leave it at that.
- Magical Properties: Proven to induce happiness and generate Instagram likes.
Note: This cake is best enjoyed in the company of friends who will be too impressed to mention the calories.
Common Mistakes to Avoid (How Not to Tame the Beast)
- A Floppy Horn: I’ve said it three times, so it must be important. If you don’t let your fondant horn and ears dry completely until they are rock hard, they will droop. Be patient.
- Melty Buttercream: If your kitchen is warm, your buttercream will get soft and refuse to cooperate. If it starts to get soupy, pop the whole cake (and your piping bags) in the fridge for 15-20 minutes to firm up.
- A Wobbly Cake: A tall cake needs to be chilled and stable. Make sure your cake layers are level and your crumb coat is firm before you attempt the final coat.
- Muddy Colors: When piping the mane, try not to let the different colors smear together too much. Pipe with confidence to keep the colors distinct and vibrant.
Variations & Customizations

The classic pastel unicorn is just the beginning!
- Gothic Glam Unicorn: Use a black or dark grey buttercream for the base coat. For the mane, use shades of deep purple, silver, and black. Paint the horn and ears with silver or black luster dust. It’s dramatic and unexpected.
- Rainbow Surprise Interior: Take your unicorn cake design to the next level by making a six-layer rainbow cake for the inside. The look on people’s faces when you cut the first slice is priceless.
- No-Fondant Unicorn: Intimidated by fondant? No problem. You can buy a pre-made horn and ears set online or use an ice cream cone for the horn! Simply frost an upside-down sugar cone and cover it in gold sprinkles.
FAQ: Your Unicorn Cake Questions Answered
Let’s clear up some common questions about this magical creation.
H3: What kind of cake and buttercream are best?
A sturdy cake like a vanilla butter cake or a doctored box mix works well. For frosting, American buttercream is easy and holds its shape, while Swiss meringue buttercream gives a silkier, less sweet finish.
H3: How far in advance can I make the horn and ears?
You can (and should!) make the fondant pieces up to two weeks in advance. Store them in a cardboard box in a cool, dry place to allow them to dry and harden perfectly.
H3: How do I get my buttercream so perfectly white?
Some butters are more yellow than others. To counteract this, you can beat the butter for a longer time and add a teeny-tiny drop of violet gel food coloring to cancel out the yellow tones.
H3: Help! My buttercream is too soft!
Your kitchen is likely too warm, or your butter was too soft to begin with. The solution is to chill everything. Put your bowl of buttercream, your piping bags, and your cake in the refrigerator for 15-20 minutes until it all firms up again.
H3: Can I make the whole cake ahead of time?

Yes. You can assemble and frost the entire cake (minus the fondant pieces) a day in advance and keep it in the fridge. Add the horn, ears, and any sprinkles right before serving for the best results.
H3: How do I transport a tall unicorn cake?
Very carefully! A tall cake box is a must. Drive like you’re transporting a member of the royal family. Take turns slowly and avoid bumps.
H3: Do I really need a cake turntable and scraper?
To get that super smooth, professional finish? TBH, yes. They are the key tools that make a huge difference. You can try to smooth it with just a spatula, but it will be much more challenging.
Final Thoughts: You Are Now a Cake Wizard
You did it. You stared into the pastel, glittery abyss of the unicorn cake design and came out victorious. You are now officially a cake wizard, capable of conjuring edible magic. Pat yourself on the back.
Go on and show off your creation. You’ve earned every last bit of praise you’re about to receive. And the next time someone asks for an impossible-sounding cake, you can just smile, because you know the secrets of the unicorn.