is that dreamy moment—perfect for birthdays, baby showers, or anytime you feel extra kawaii.
Why This Hello Kitty Cake Is Meow-velous
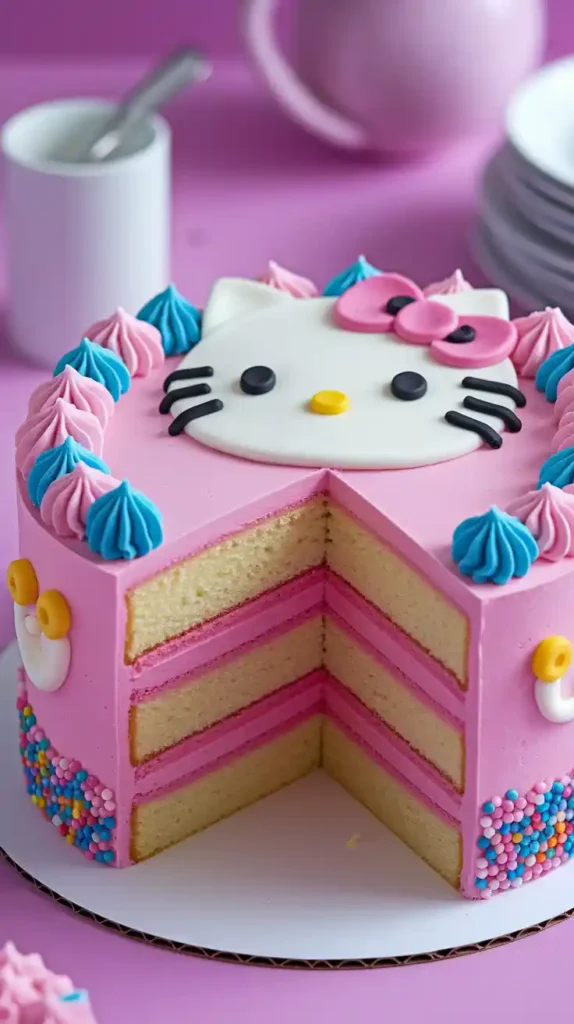
This Hello Kitty cake combines soft vanilla sponge, silky buttercream, and a simple fondant design that’s totally achievable. It’s sweet, stylish, crowd-pleasing, and delivers maximum “aww” with minimal fuss—no pro decorator experience needed!
🛒 Ingredients

- 2 ½ cups all-purpose flour
- 2 cups granulated sugar
- 1 tbsp baking powder
- ½ tsp salt
- 1 cup unsalted butter, softened
- 4 large eggs
- 1 cup milk (whole or plant-based)
- 2 tsp vanilla extract
- Red food coloring (for Hello Kitty’s bow)
- Buttercream Frosting:
- 1 cup unsalted butter, softened
- 4 cups powdered sugar
- 2 tsp vanilla extract
- 2–3 tbsp milk or cream
- Fondant Decorations:
- White fondant (kitty head and whiskers)
- Pink/red fondant (bow and cheeks)
- Edible black marker or fondant for eyes and nose
Substitutions:
- Vegan? Use dairy-free butter, plant milk, aquafaba or flax eggs.
- Nut-free? This recipe is naturally nut-free—high five!
🧰 Tools & Kitchen Gadgets Used
- Two 8-inch cake pans
- Electric mixer – stand or handheld
- Mixing bowls – dry and wet separates
- Offset spatula & bench scraper – for smooth frosting
- Fondant rolling pin and modeling tools
- Hello Kitty cutter or template – for shaping fondant
- Cake turntable (optional, but smooth operator)
- Piping bag – for buttercream details
- Cake board or stand – display-ready
👩🍳 Step-by-Step Instructions
- Prep pans: Preheat oven to 350°F (175°C); grease and line pans.
- Dry mix: Whisk flour, sugar, baking powder, and salt.
- Butter mix: Cream butter until fluffy, then beat in eggs, vanilla.
- Combine: Alternate adding dry mix and milk until just blended.
- Bake: Divide batter between pans; bake ~25 minutes or until a toothpick comes out clean.
- Cool: Let cakes cool 10 minutes in pans, then cool fully on racks.
- Frost: Whip buttery frosting until airy, then layer & coat cakes smoothly.
- Decorate with fondant:
- Roll white fondant, cut Hello Kitty face and ears
- Roll pink/red fondant for bow and cheeks
- Use edible pen or fondant to add eyes, nose, whiskers
- Place on cake front center
- Add final touches: Pipe little hearts or dots around the base.
- Serve and watch the smiles roll in!
🔢 Calories & Nutritional Info (Per Slice, 12 slices)
- Calories: ~480 kcal
- Protein: 4 g
- Carbs: 60 g
- Fat: 24 g
Definitely a treat—save your selfie for after cake.
🚫 Common Mistakes to Avoid
- Fondant too thick → kitty face gets chunky
- Crumbly cakes → let layers cool fully before frosting
- Fondant cracks → roll thin and moisten cake lightly
- Rushing modeling → fondant needs gentle patience (and tea)
🔁 Variations & Customizations
- Chocolate Kitty: Swap half the flour for cocoa for a chocolate version.
- Strawberry Frosting: Add freeze-dried strawberry powder to frosting.
- Mini Cupcakes: Bake in cupcake tins and adorn with small fondant faces.
👇 FAQ: Hello Kitty Cake
Q1: Can I use canned frosting?
A: Sure! Use it for crumb coat; homemade gives better texture.

Q2: How long does fondant decoration last?
A: Up to 3 days at cool room temp in airtight container.
Q3: Can I assemble ahead?
A: Yes—stack & crumb coat a day before. Frost and decorate the next.
Q4: Gluten-free option?
A: Use a 1:1 gluten-free flour blend.
Q5: Does it freeze well?
A: Freeze unfrosted layers; thaw before frosting.
Q6: Vegan version?
A: Use dairy-free butter, milk, and egg substitutes.
Q7: Kids can help?
A: Absolutely—mini fondant decorators make the best memories!
🎉 Final Thoughts

This Hello Kitty cake is all about fun, cuteness, and celebration. It’s easier than it looks but nails the wow-factor. Make one, snap pics, and create sweet memories—because homemade love tastes the best. 🎀