5 Easy Cake Decorating Ideas That Look Insanely Professional (Even If You’re a Total Beginner)
Ever stared at a plain, slightly lopsided cake and felt a wave of pure, unadulterated panic? Yeah, me too. You baked the thing (or, let’s be real, you bought it from the store), and now it’s just… sitting there. Naked. Judging you. You scroll through Instagram and see these impossibly perfect cakes, and you think, “I’d need a PhD in fondant and a fairy godmother to pull that off.”
Well, I’m here to tell you to put down the phone and pick up a spatula. You don’t need years of pastry school or a kitchen full of intimidating gadgets. I’m going to share some ridiculously easy cake decorating ideas that will make your friends think you secretly moonlight as a professional baker. Seriously. These are my go-to, no-fail, “I-swear-I-made-this” tricks.
Why These Ideas Are Pure Genius
So, why should you trust me and these specific techniques? First off, they are foolproof. I’ve designed them for maximum wow-factor with minimum effort. We’re talking 15 minutes of decorating, tops.
Second, they are incredibly versatile. Whether it’s a birthday bash, a holiday dinner, or a Tuesday night that just calls for cake (and when doesn’t it?), these ideas fit the bill. You’ll look like you slaved away for hours when, in reality, you had time to watch an extra episode of that show you’re binging. It’s our little secret. 😉
The “Bare Minimum” Ingredients List
This is less of a strict recipe and more of a choose-your-own-adventure guide. You just need a cake, some frosting, and your chosen flair.
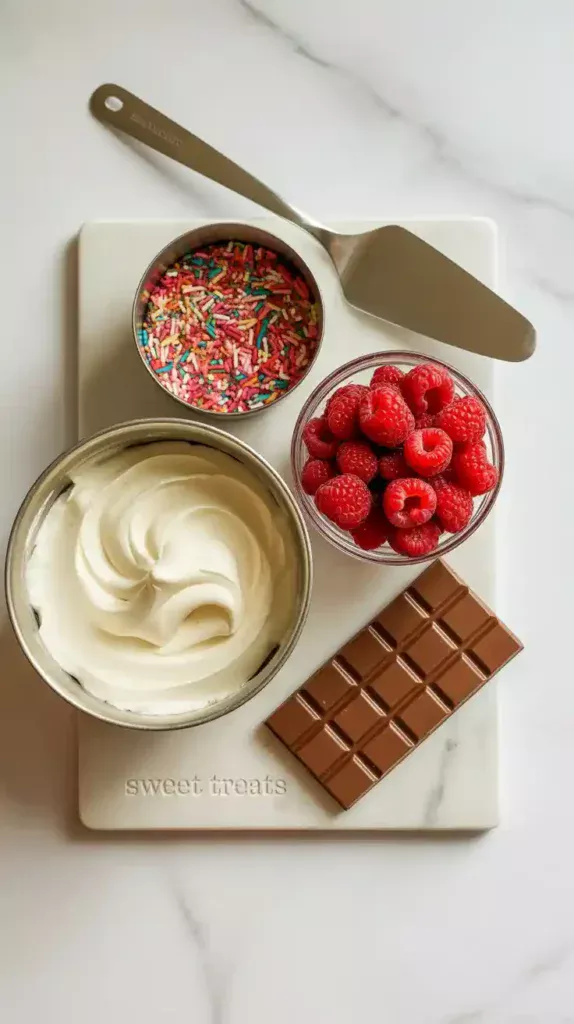
- One baked and cooled cake: Any flavor, any size. Seriously, a box mix cake is 100% acceptable. Heck, a store-bought plain cake is your best friend here. No judgment.
- A tub of frosting: Or about 2-3 cups of your favorite homemade buttercream. Canned frosting is a lifesaver, and you can whip it for a few minutes with a mixer to make it fluffier and taste less… canned.
- Your choice of “flair” (pick one or more):
- For the Drip: 1 cup semi-sweet chocolate chips + 1/2 cup heavy cream.
- For the Sprinkle Ambush: A LOT of sprinkles. Jimmies, nonpareils, confetti sprinkles—go wild.
- For the Rustic Look: Nothing extra needed!
- For the Fresh & Fruity: A punnet of fresh berries (raspberries, blueberries, sliced strawberries).
- For the Stencil Queen: 2 tablespoons of powdered sugar or unsweetened cocoa powder.
Tools & Kitchen Gadgets for Your Arsenal
While these ideas are low-tech, a few basic tools make life infinitely easier. If you’re looking to build your baking toolkit, these are the non-negotiables IMO.
- Cake Turntable: This isn’t just for pros. It’s a GAME CHANGER for getting smooth frosting.
- Offset Spatula: The weird-looking bent spatula? It’s your new best friend for slathering on frosting without getting your knuckles in it.
- Bench Scraper: For achieving those impossibly smooth sides. It’s cheap and more effective than any regular spatula.
- Mixing Bowls: You can never have too many.
- Silicone Spatulas: For scraping every last bit of frosting out of the bowl.
- Decorative Stencils: You can find these online or at craft stores for just a few bucks.
- A Good Whisk: Essential for making a smooth, lump-free chocolate ganache for your drip.
The Step-by-Step Guide to Faking It ‘Til You Make It

First things first: get a decent layer of frosting on your cake. This is your canvas. A thin “crumb coat” first, a 10-minute chill in the fridge, and then a final, thicker layer will prevent pesky crumbs from ruining your masterpiece. Now, choose your destiny.
Technique 1: The Effortless Rustic Swirl
This is for the person who says, “I’m going for a rustic look” when they mess up. Except this time, you mean it.
- Plop a generous amount of frosting on top of your cake.
- Take the back of a spoon or your offset spatula.
- Press down gently into the frosting and swirl it around, creating swoops and peaks. That’s it. You’re done. It’s art. It’s supposed to look that way.
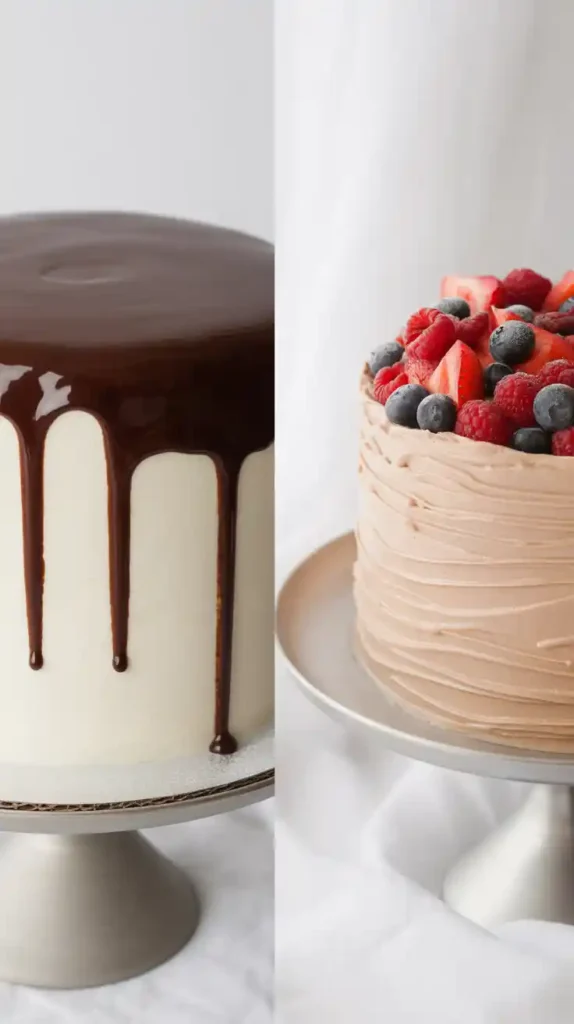
Technique 2: The Chocolate Drip Drama
A chocolate drip looks so chic and complicated, but it’s laughably easy.
- Make the ganache: Heat the heavy cream in a small saucepan or in the microwave until it’s just simmering (don’t boil it!). Pour the hot cream over your chocolate chips in a heatproof bowl. Let it sit for 5 minutes, then whisk until it’s smooth and glossy.
- Let it cool: This is the most important step. Your ganache needs to be slightly warm, but thick enough to be spoonable, not watery. Let it cool for 10-15 minutes.
- Drip it: Use a spoon to gently push small amounts of ganache over the edge of your chilled, frosted cake. Let gravity do the work! Once the drips are done, you can pour the rest on top and spread it out.
Technique 3: The Sprinkle Ambush
There is no problem that cannot be solved by an obscene amount of sprinkles.
- Place your frosted cake on a baking sheet (this will catch the fallout).
- Take a handful of sprinkles and gently press them into the sides of the cake, working your way around.
- Once the sides are covered, go nuts on top. Cover the whole thing or just create a border. More is more.
Technique 4: The Fresh & Fruity Illusion
Want to make your sugar-laden cake look… healthy-ish? Add fruit!
- Wash and dry your berries thoroughly. Nobody wants soggy cake.
- Arrange the fruit artfully on top. A crescent moon shape along one edge is classic. A big pile in the middle also works.
- Combine whole berries with sliced ones for extra texture and visual appeal. Bonus points if you add a sprig of mint.
Technique 5: The Stencil Fake-Out
This is my favorite trick for when I have zero time.
- Ensure your top frosting is smooth and well-chilled.
- Gently place a stencil (a doily also works in a pinch!) on top of the cake.
- Use a fine-mesh sieve to dust a light, even layer of powdered sugar (for dark cakes) or cocoa powder (for light cakes) over the stencil.
- Carefully lift the stencil straight up. Boom. Instant elegance.
Calories & Nutritional Info (Let’s Not Kid Ourselves)

Look, we’re decorating cake. This isn’t a health food convention. But for those who are curious:
- Estimated Calories: A standard slice of vanilla cake with buttercream, decorated, will run you anywhere from 400 to 600 calories.
- The Drip: Adds about 50-80 calories per slice.
- The Sprinkles: Mostly sugar, adds about 20-40 calories.
- The Fruit: Adds fiber and vitamins! And maybe 10-20 calories. We’ll call it a win.
- FYI: The nutritional value here is pure, unadulterated joy.
Common Mistakes That Scream “Amateur” (And How to Avoid Them)
We’ve all been there. Save yourself the heartache.
- Frosting a Warm Cake: I cannot stress this enough. DO NOT FROST A WARM CAKE. It will melt the frosting into a greasy, heartbreaking puddle. Let it cool completely. No, really. Walk away for a few hours.
- Skipping the Crumb Coat: You’ll get little cake hairs in your final frosting layer. It’s not cute. A thin initial layer of frosting traps the crumbs. Chill it, then frost for real.
- Using Ganache That’s Too Hot: Your beautiful drips will run straight down to the bottom and pool in a sad mess. Test it first. If it runs too fast, let it cool longer.
- Forgetting to Level Your Cake: If your cake is domed, slice off the top with a serrated knife to create a flat surface. A flat cake is a happy cake.
Variations & Customizations
Once you’ve mastered the basics, why not get a little wild?
- Go Technicolor: Add a few drops of gel food coloring (not the watery kind!) to your vanilla frosting. Create an ombré effect by dividing your frosting into three bowls and making each a slightly darker shade.
- Flavor Overload: Add a teaspoon of almond, lemon, or peppermint extract to your frosting. Use white chocolate for your drip and color it with oil-based food coloring. Try a peanut butter frosting with a chocolate drip. The possibilities are endless.
- Keto-Friendly Chic: Use your favorite keto cake recipe or mix. Make a frosting with powdered erythritol, butter, and heavy cream. Decorate with a sugar-free dark chocolate drip, a sprinkle of chopped nuts, or low-carb berries like raspberries.
Frequently Asked Questions (Because You’re Not the Only One Wondering)
H3: How can I decorate a cake without any special tools? Use the back of a spoon for the rustic swirl look. Arrange fruit or candy on top. Or, my personal favorite, just cover the whole thing in chocolate shavings made with a simple vegetable peeler.
H3: What is the easiest frosting to decorate with? American buttercream is the most forgiving. It’s just butter, powdered sugar, a splash of milk/cream, and vanilla. It holds its shape well and is easy to smooth. Plus, store-bought frosting is your friend in a pinch!
H3: How do you make a plain cake look good? The stencil trick is the fastest way. A simple dusting of powdered sugar can look incredibly elegant. A well-executed chocolate drip or a beautiful pile of fresh berries also instantly elevates a plain cake.

H3: How can I make a store-bought cake look homemade? Scrape off the weird rosettes and greasy borders! Add a fresh coat of your own (or better) frosting. Then use any of the techniques above. The chocolate drip is particularly effective at hiding a store-bought identity.
H3: What can I use instead of a piping bag? A Ziploc bag! Just fill it with frosting, push it to one corner, and snip a tiny bit of the corner off. It works perfectly for simple lines or writing.
H3: How do you get perfectly smooth frosting on a cake? The secret is a cake turntable and a bench scraper. Get a good layer of frosting on, then hold the bench scraper straight against the side while you spin the turntable. It’s surprisingly easy and deeply satisfying.
H3: Can I decorate a cake the day before? Absolutely! Most buttercream cakes are perfectly fine decorated a day ahead and stored in the fridge. Just be sure to let it sit at room temperature for about 30-60 minutes before serving so the frosting can soften up.
Final Thoughts
So there you have it. Your official permission to stop being intimidated by cake decorating. You don’t need to be a perfectionist; you just need a spoon, some sprinkles, or a handful of berries to create something that looks amazing and tastes even better.
Now, go forth and conquer that naked cake. Turn it into a masterpiece that will have everyone asking for your secret. And when they do, just smile mysteriously and say, “Oh, it was nothing.”