The Ultimate Guide to Gorgeous Flower Cake Designs (For the Rest of Us)
Let’s be honest, flowers make everything better. A dreary Tuesday? Add flowers. A boring room? Add flowers. A plain, unassuming cake? Darling, it’s begging you to cover it in a glorious, blooming masterpiece. If you’ve ever scrolled through Pinterest, sighing at breathtaking floral cakes and thinking, “I could never do that,” then this is for you. Welcome to your ultimate guide to the flower cake design.
Forget the idea that you need to be a professional pastry artist with years of training. We’re going to demystify the process and show you three—yes, three!—stunning and surprisingly achievable ways to create a flower-adorned cake. Whether you’re a complete beginner or just looking to up your game, you’re about to become a floral cake virtuoso.
Why This is Your New Go-To Celebration Cake
So, why should you dive into the world of edible bouquets? Let me count the ways.
- It’s a Three-in-One Masterclass: I’m not just giving you one design; I’m teaching you three distinct techniques, from ridiculously easy to impressively artistic. You can choose your own adventure based on your mood and skill level.
- It’s Timelessly Beautiful: A flower cake is the definition of elegance. It’s perfect for literally any occasion that calls for a touch of beauty—birthdays, bridal showers, baby showers, spring celebrations, or just a “because I deserve it” Tuesday.
- The Flavor is as Lovely as the Look: To complement our floral theme, we’re making a delicate and sophisticated Lemon & Elderflower cake. It’s light, fragrant, and the perfect canvas for your buttercream garden.
The Ingredient List: The Seeds of Your Creation
A beautiful garden needs good soil. Our cake is no different.
For the Lemon & Elderflower Canvas Cake:
- All-Purpose Flour: 2 ¾ cups.
- Baking Powder: 2 ½ teaspoons.
- Salt: ½ teaspoon.
- Unsalted Butter: 1 cup (2 sticks), softened.
- Granulated Sugar: 1 ¾ cups.
- Large Eggs: 4, at room temperature.
- Lemon Zest: From 2 lemons.
- Vanilla Extract: 1 teaspoon.
- Elderflower Liqueur (like St-Germain) or Elderflower Cordial: ¼ cup.
- Buttermilk: 1 cup, at room temperature.
For the “Petal-Perfect” Buttercream:
- Unsalted Butter: 2 cups (4 sticks), softened.
- Powdered Sugar: 7-8 cups, sifted.
- Heavy Cream or Milk: 5-7 tablespoons.
- Vanilla Extract: 2 teaspoons.
- A Pinch of Salt.
- Gel Food Colorings: Assorted floral and foliage colors (e.g., pink, yellow, peach, leafy green).
Tools & Kitchen Gadgets: The Gardener’s Kit
Every artist needs their tools. Here’s what you’ll need to plant your edible garden.
- A Stand Mixer or Hand Mixer.
- Three 8-inch Round Cake Pans.
- A Cake Turntable: Incredibly helpful for all three designs.
- An Offset Spatula and a Bench Scraper: For a smooth, professional canvas.
- Piping Bags and an Assortment of Tips: Essential for the buttercream bouquet. A large star tip (Wilton 1M) and a leaf tip (Wilton #352) are great starters.
- A Small Palette Knife or a small offset spatula: For the impressionist garden design.
- Food-Safe Fresh Flowers: For the easiest and quickest design.
Step-by-Step Instructions: Let’s Get Growing

We’ll build our masterpiece in stages: baking the cake, mixing our frosting palette, and then choosing our design.
Part 1: Bake Your Garden Bed
- Prep: Preheat your oven to 350°F (175°C). Grease and flour your three 8-inch cake pans.
- Mix: In your stand mixer, cream the butter and sugar until light and fluffy. Add the eggs one at a time, followed by the lemon zest and vanilla. In a separate bowl, whisk your dry ingredients.
- Combine: On low speed, alternate adding the dry ingredients and the buttermilk. Finally, mix in the elderflower liqueur/cordial. Do not overmix.
- Bake: Divide the batter between your pans and bake for 25-30 minutes, until a toothpick comes out clean. Let the cakes cool completely.
Part 2: Mix Your Buttercream Palette
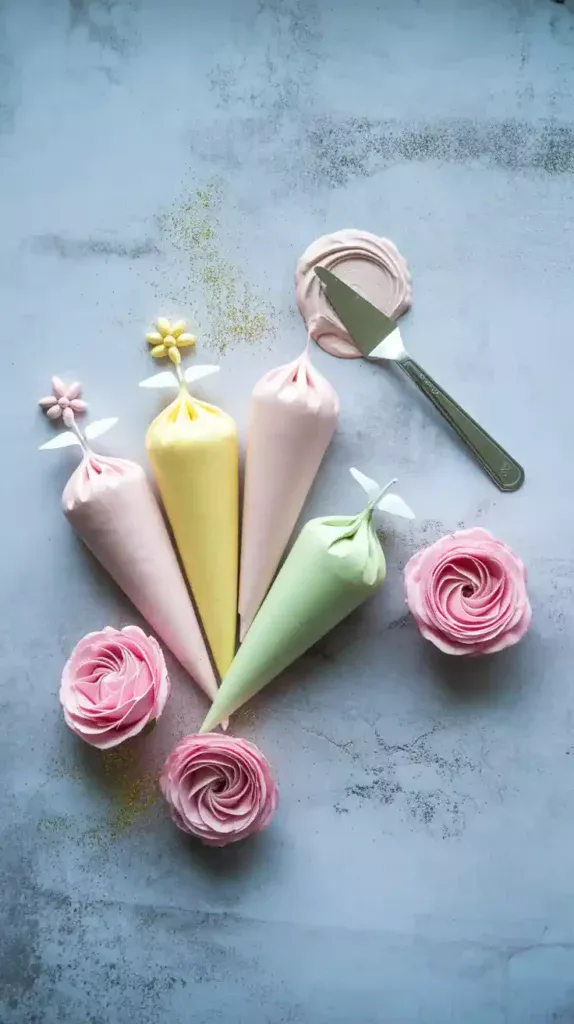
Make your buttercream by beating the softened butter, then gradually adding the sifted powdered sugar, vanilla, salt, and cream until light and fluffy. Divide the frosting into several bowls and use gel food coloring to tint them into your desired floral and leafy green shades.
Part 3: Choose Your Bouquet! (Three Flower Cake Designs)
All three designs start after you have leveled, filled, and frosted your cake with a smooth base coat of white or pale-colored buttercream.
Design 1: The Effortless Elegance (Using Fresh Flowers)
This is the easiest and arguably one of the most beautiful methods.
- Source Your Flowers: This is the most important step. You must use food-safe, non-toxic, and preferably organic flowers. Good choices include roses, pansies, lavender, carnations, and chamomile.
- Prep the Flowers: Gently wash and thoroughly dry your flowers. Trim the stems to about 1-2 inches.
- Wrap the Stems: Wrap the end of each stem tightly in a small piece of plastic wrap or floral tape. This prevents direct contact between the stem and the cake.
- Arrange: Gently insert the wrapped stems into your frosted cake, arranging them in a beautiful crescent shape on top or cascading down the side.
Design 2: The Impressionist Garden (Palette Knife Painting)
This trendy, artistic method is surprisingly forgiving.
- Place small dollops of your different colored frostings onto a plate or a piece of parchment paper, just like an artist’s palette.
- Using the tip of a small offset spatula or a palette knife, pick up a little bit of one color.
- Press the spatula gently onto the side of your chilled cake and swipe to create an abstract “petal” shape. Wipe your spatula clean.
- Repeat the process, overlapping different colors to build up beautiful, textured, abstract floral shapes. Add some green swipes for leaves.
Design 3: The Classic Buttercream Bouquet
This is the most traditional method and a fantastic skill to learn.
- Fill a piping bag fitted with a large star tip (like a Wilton 1M) with your main flower color.
- To pipe a rosette, start in the center and pipe a spiral outwards. Pipe a cluster of these in a crescent shape on top of your cake.
- Fill another piping bag fitted with a leaf tip (like a Wilton #352) with green frosting.
- Pipe leaves in the gaps between your rosettes by squeezing gently and then pulling away.
Calories & Nutritional Info (A Bed of Roses)

This cake is a work of art. Admiring art is good for the soul. Therefore, this cake is good for you. It’s just logic.
- Primary Ingredient: Beauty.
- Calories: Let’s just say it’s an indulgence in full bloom.
- Serving Size: A slice of pure happiness.
Common Mistakes to Avoid (Wilting Woes)
- Using Poisonous Flowers: I cannot stress this enough. For the fresh flower design, you must research and ensure your flowers are non-toxic and food-safe. Many common flowers (like hydrangeas and baby’s breath) are toxic. When in doubt, ask your florist or don’t use it.
- Droopy Buttercream Petals: If your buttercream flowers are looking soft and melty, your frosting is too warm. Buttercream is your friend, but the fridge is your best friend. Pop your piping bags and your cake in the fridge for 15 minutes to firm everything up.
- A Muddy Palette: When doing the palette knife painting, wipe your spatula clean between colors. This is the key to keeping your colors bright and distinct instead of blending them into a brownish-grey mess.
- Going Overboard: Often, the most elegant flower cakes have a focal point, like a crescent of flowers on top or a cascade down one side. Resist the urge to cover every square inch in flowers. Negative space is your friend.
Variations & Customizations (The Secret Garden)
Once you’ve mastered a technique, you can let your creativity blossom.
1. The Wildflower Meadow
Instead of large, structured roses, use a variety of small piping tips (small star tips, round tips, drop flower tips) to pipe a beautiful, scattered assortment of tiny, colorful “wildflowers” all over the sides and top of your cake.
2. The Modern Succulent Garden
A trendy and stunning alternative. Tint your buttercream into shades of sage green, dusty purple, and grey-blue. Use a variety of star and petal tips to pipe a cluster of buttercream succulents on top of the cake. It’s modern, chic, and totally unexpected.
3. The Delicate Pressed Flower Design
For a truly ethereal, cottagecore look. Source edible, pressed flowers online or from a specialty store. While your final coat of buttercream is still soft and tacky, gently use tweezers to arrange and press the delicate dried flowers onto the sides of the cake.
FAQ: Your Budding Questions, Answered
What are some common, safe-to-use flowers for cakes?
Roses, pansies, violas, lavender, carnations, chamomile, cornflowers, and marigolds are all generally considered safe. Always source them from a reputable place (organic and pesticide-free is best) and never use flowers from a roadside.
How do I properly prepare fresh flowers before putting them on a cake?

Gently wash them and let them air dry completely. Trim the stems and wrap each stem in a small piece of floral tape or plastic wrap. This creates a barrier between the stem and the cake.
My piped flowers look like shapeless blobs. What am I doing wrong?
Your frosting is almost certainly too soft. A stiff consistency is key for defined petals. Try adding a bit more powdered sugar to your buttercream or chilling your piping bag in the fridge for 15-20 minutes.
Can I make the buttercream flowers in advance?
Yes! This is a great time-saving trick. Pipe your flowers onto small squares of parchment paper and place them in the freezer until they are frozen solid. You can then peel them off the paper and arrange them on your frosted cake.
What’s the best frosting for piping flowers?
A stiff American buttercream (like the one in this recipe) is the easiest and most reliable for beginners. A buttercream made with half shortening is even more stable in warm weather.
How do I get realistic-looking flower colors?
The secret is to use more than one shade. For a pink rose, for example, mix a main bowl of pink, then add a tiny bit more red to a small part of it for a darker shade, and a little white to another for a lighter shade. Using these different shades adds depth and dimension.
What other flavors pair well with a floral cake design?
Light, delicate, and bright flavors are perfect. Almond, rosewater, orange blossom, strawberry, raspberry, and pistachio are all fantastic choices that complement the beautiful aesthetic.
Final Thoughts
You’ve done it. You have turned a simple cake into a blooming, edible garden. You’ve harnessed the power of piping tips and the beauty of nature to create a masterpiece that is almost too pretty to eat. Almost.
So go on, stop and smell the roses… and then cut a giant slice and enjoy the delicious fruits (or flowers) of your labor. You are now officially a cake artist.