How to Make a 2 Tier Birthday Cake Without a Meltdown
Alright, let’s talk. You’ve baked cookies. You’ve mastered cupcakes. You’ve even made a pretty decent single-layer cake. But now, you feel that familiar itch. The ambition is bubbling. You’re staring into the baking abyss and thinking, “I can do more.” You’re thinking about making a 2 tier birthday cake.
Welcome, my brave friend, to the final boss of home baking. A tiered cake is that glorious, towering confection that screams “this is a SERIOUS celebration.” It looks intimidating, complicated, and like something only a pro with a fancy hat should attempt. But what if I told you that you, in your very own kitchen, can build this edible skyscraper?
I’m going to walk you through every single step, from baking to building. We’ll talk structure, support, and how to avoid a catastrophic, leaning tower of cake. You are about to level up your baking game in a big way.
Why This Recipe is Your Gateway to Greatness
Before you start hyperventilating into a paper bag, let’s talk about why tackling this project is 100% worth it.
- The Ultimate “Wow” Factor: Nothing, and I mean nothing, makes an impression like a tiered cake. It instantly elevates any birthday, anniversary, or celebration from “party” to “event.” You will be hailed as a baking god. Prepare for the applause.
- It’s a Structural Masterpiece (That You Can Eat): This recipe is as much about engineering as it is about flavor. You’ll learn the crucial techniques of cake support that professionals use. It’s a skill that, once learned, you’ll have forever.
- Deceptively Simple Steps: Yes, it looks complex. But a tiered cake is just two separate cakes, one stacked on top of the other with a secret support system. We’ll break it down into such easy, manageable phases that you’ll wonder why you were ever scared.
The Ingredient Lineup
For a tiered cake, you need a cake that’s a little sturdy—this is not the time for an airy, delicate angel food cake. This vanilla butter cake is delicious but has enough structure to hold up. This recipe makes enough batter for one 8-inch tier and one 6-inch tier.
For the Sturdy Vanilla Cake Tiers:
- Unsalted Butter: 2 cups (4 sticks), softened to room temperature. Do not cheat this; room temp is critical.
- Granulated Sugar: 4 cups.
- Large Eggs: 8 of them, at room temperature.
- Vanilla Extract: 2 tablespoons. Use the good stuff!
- All-Purpose Flour: 6 cups, spooned and leveled.
- Baking Powder: 4 teaspoons.
- Salt: 1 ½ teaspoons.
- Whole Milk: 2 cups, at room temperature.
For the Stable Buttercream Frosting:
- Unsalted Butter: 3 cups (6 sticks), softened.
- Powdered Sugar: 9-10 cups, sifted. Yes, that much.
- Vanilla Extract: 1 tablespoon.
- Heavy Cream or Milk: 6-8 tablespoons.
- Salt: A generous pinch.
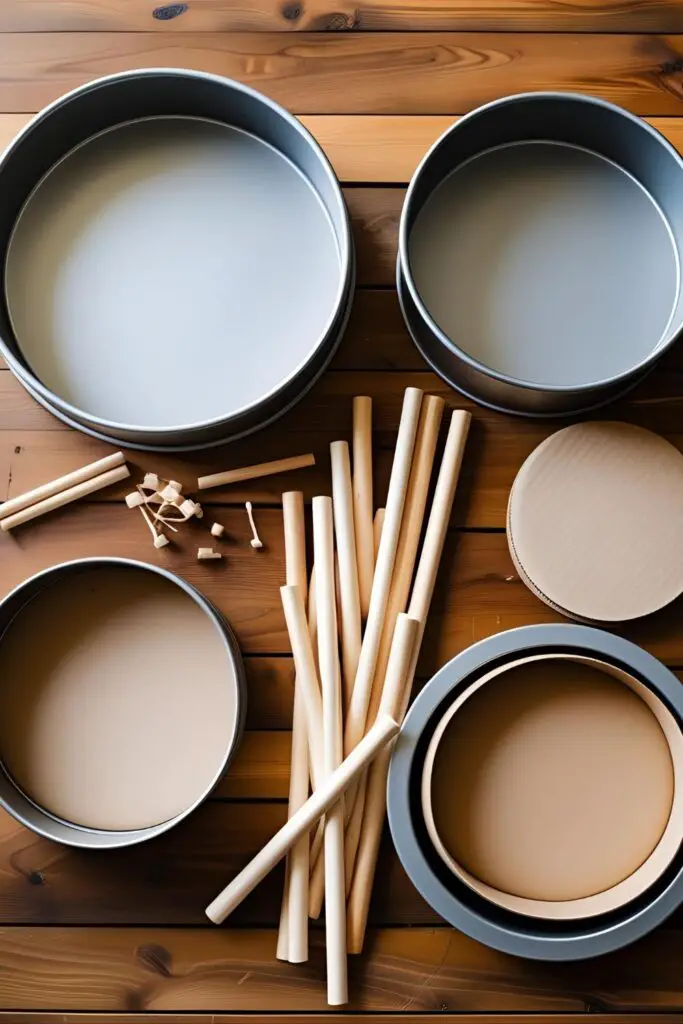
Tools & Kitchen Gadgets: The Non-Negotiables

This is less of a suggestion list and more of a “you absolutely need these things to avoid disaster” list. This is where we separate the hobbyists from the architects.
- Cake Pans: Two 8-inch round pans and two 6-inch round pans.
- Cake Boards (Cardboard Rounds): You need one 8-inch board (for the base) and one 6-inch board (for the top tier to sit on).
- DOWEL RODS: This is the most important tool. You can use wooden or plastic ones. They are the hidden pillars that keep your top tier from squishing your bottom tier into a pancake. This is not optional.
- Cake Turntable: Will make frosting your cakes infinitely easier.
- Large Offset Spatula & Bench Scraper: For achieving those smooth, professional-looking sides.
- Stand Mixer: You can do this with a hand mixer, but your arm will want to disown you.
- Wire Cooling Racks: To cool all four of your cake layers properly.
- Bubble Tea Straws: A great, cheap alternative to dowels if you can’t find them!
Step-by-Step Instructions: Time to Build-a-Cake
Take a deep breath. We’re going to approach this like a construction project: foundation, structure, and then decoration.
Phase 1: Bake Your Tiers
- Prep Station: Preheat your oven to 350°F (175°C). Grease and flour all four of your cake pans (2×8-inch, 2×6-inch) and line the bottoms with parchment paper.
- Make the Batter: In a stand mixer, cream the butter and sugar for 5-7 minutes until very light and fluffy. Add the eggs one at a time, followed by the vanilla. In a separate bowl, whisk the flour, baking powder, and salt.
- Combine: On low speed, alternate adding the flour mixture and the milk to the mixer bowl, beginning and ending with the flour. Mix only until combined. Do not overmix.
- Divide and Conquer: Divide the batter between your pans. A good rule of thumb is about 3 ½ cups of batter for each 8-inch pan and about 2 ¼ cups for each 6-inch pan.
- Bake: Bake the 6-inch cakes for 30-35 minutes and the 8-inch cakes for 40-45 minutes. A toothpick inserted into the center should come out clean. Let them cool in their pans for 15 minutes before turning out onto wire racks to cool completely.
Phase 2: Assemble Your Two Cakes
- Make the Buttercream: While the cakes cool, beat the softened butter until creamy. Slowly add the sifted powdered sugar, vanilla, and salt. Add the cream a little at a time until you reach a stiff but smooth consistency.
- Level and Fill: Once cool, level your cakes if they have a dome (a long serrated knife works well). Place your first 8-inch layer on the 8-inch cake board. Top with frosting. Add the second 8-inch layer. Do the same for the 6-inch cake layers, but build this one on the 6-inch cake board.
- Crumb Coat: Apply a thin layer of frosting to both of your assembled cakes. This is your crumb coat. Chill both cakes in the fridge for at least 30 minutes until the frosting is firm.
- Final Coat: Apply a final, beautiful, smooth coat of frosting to both cakes separately. Get them as perfect as you want. Now chill them again while you mentally prepare for the next step.
Phase 3: The Engineering – Adding Support
- Measure the Dowels: Take one of your dowel rods (or bubble tea straws) and push it straight down into the center of your 8-inch bottom tier. Mark the dowel right where it meets the top of the frosting. Pull it out.
- Cut the Dowels: This first dowel is your guide. Cut it cleanly at the mark. Now, cut 4-5 more dowels to the exact same length. You want them all to be perfectly flush with the frosting.
- Insert the Dowels: Push the cut dowels into the 8-inch cake. Arrange them in a circle, about 1-inch inside where the 6-inch cake will sit. This creates a hidden platform for your top tier.
Phase 4: The Grand Finale – Stacking
- The Moment of Truth: Using a large spatula, carefully lift your chilled 6-inch cake (which is on its own board) and center it on top of the 8-inch cake, right over the dowels.
- Breathe: You did it. The hard part is over. Your cake is stacked and supported.
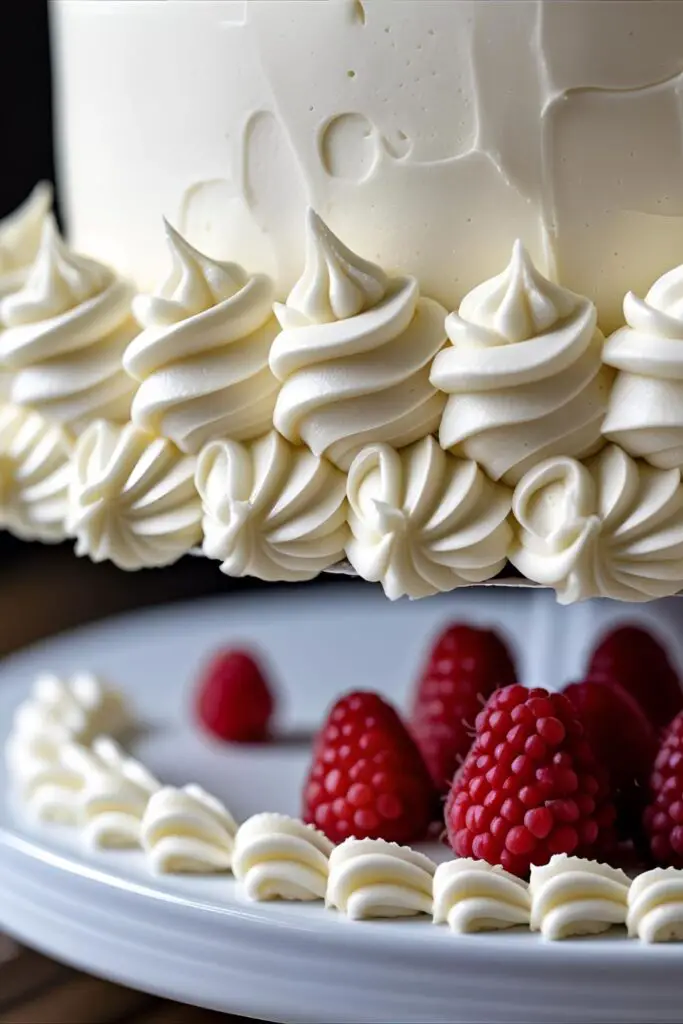
- Decorate: Now for the fun part. Use a piping bag to add a decorative border around the base of the top tier. This hides the seam and the cardboard edge. Add whatever other sprinkles, swirls, or decorations your heart desires.
Calories & Nutritional Info (Structural Integrity Information)
Listen, you just built a two-story building out of flour and sugar. We’re not here to count calories. But if you must know, a slice is a slice.
- Calories: Approximately a bajillion. (Okay, probably 700-800 kcal per generous slice).
- Primary Nutrient: Joy and a sense of accomplishment.
- Serves: A whole bunch of very impressed people.
FYI, worrying about calories when faced with a 2 tier cake is a sign of a deeply troubled soul. Just enjoy it.
Common Mistakes to Avoid (Cake-struction Hazards)
- SKIPPING THE DOWELS: I will fly to your house and stop you. This is the single most important step. Without dowels, the weight of the top tier will crush the bottom tier into a sad, dense, bulging mess. USE. THE. DOWELS.
- Using a Flimsy Cake Recipe: A light chiffon or sponge cake will not survive. You need a sturdy cake recipe like the one above, or a good pound cake, that can handle the weight.
- Forgetting the Cake Board Under the Top Tier: The top tier MUST be on its own cardboard round. This is what allows you to lift it and what provides a stable base for it to sit on the dowels.
- Not Chilling the Cakes: Cold cakes are stable cakes. They are firmer, easier to handle, and the frosting sets up better. Don’t rush the chilling steps.
Variations & Customizations
Now that you’re a structural engineer, you can get creative.
1. The Flavor Duplex
Make each tier a different flavor! A rich chocolate fudge cake for the bottom tier and a zesty lemon or fresh strawberry cake for the top tier is a classic combination. Your guests will love the choice.
2. The “Naked” Cake Aesthetic

Feeling rustic? A “naked” or “semi-naked” cake is perfect. After you stack the cakes, just do a very thin, rustic scrape of frosting around the outside, leaving the layers peeking through. It’s chic and, bonus, way easier than getting a perfectly smooth finish.
3. The Drip Cake
After stacking, create a beautiful chocolate or caramel ganache. Gently spoon it around the top edge of both tiers, letting it drip artfully down the sides. It’s a stunning and dramatic effect.
FAQ: Your Tiered Cake Anxieties, Answered
What exactly are dowel rods and where do I get them?
They are food-safe plastic or wooden rods used for internal cake support. You can find them at craft stores (like Michael’s), baking supply stores, or online. Thick bubble tea/boba straws are an excellent and widely available substitute.
How do I transport this thing without having a heart attack?
Very carefully. The safest way is in a box on a flat surface in your car, like the floor or the trunk—never on a slanted seat. Drive like you’re transporting a member of the royal family.
Can I stack more than two tiers?
Once you master two, the principle is the same for three or four! Each tier (except the very top one) needs its own set of dowels to support the tier above it.
How far in advance can I make this cake?
You can bake the layers up to 3 days ahead and keep them wrapped in the fridge. You can assemble and frost the entire cake the day before serving. Keep it chilled in the fridge.
Help, my cake is starting to lean!

This usually means your dowels weren’t cut to the same length or your cake wasn’t level. If it’s a minor lean, you can sometimes camouflage it with decorations. If it’s major, your best bet might be to carefully de-stack, re-level, and try again. A long, central dowel sharpened at the end and pushed through all tiers can also help with stability.
What are the best cake pan size combinations?
The key is to have a 2 to 4-inch difference between your tiers. 8-inch and 6-inch is a classic. 10-inch and 8-inch gives a grander look. 9-inch and 6-inch also works well.
How on earth do I serve a 2 tier cake?
You serve it one tier at a time! Remove any external decorations, then slide a knife around the base of the top tier and lift the entire 6-inch cake off. Place it on a cutting board, slice, and serve. Then, pull the dowels out of the bottom tier and slice and serve it.
Final Thoughts
You did it. You faced the final boss, and you won. You have successfully engineered, constructed, and decorated a 2 tier birthday cake. Go ahead and update your resume to include “Structural Cake Engineer.” You’ve earned it.
Now, put that masterpiece on display, accept the torrent of compliments that are about to come your way, and cut yourself a giant, well-deserved slice. You’ll never look at a store-bought cake the same way again.